
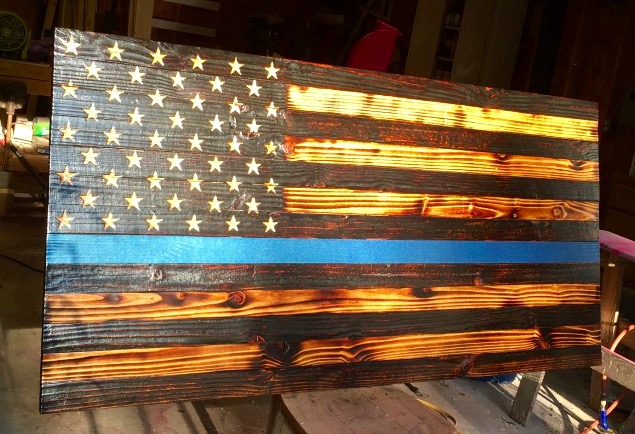
07 Sep Rustic American Outdoor Flag / DIY
This flag is 35.75” x 71” and it is the largest flag that I have made so far. Making a flag this size is a little more challenging than making the small flags, yet they are still made pretty much the same way. The main differences being that it is too large to fit on my work bench so I had to put it together on the floor and I didn’t have any 3’ clamps that would clamp the boards together.
I wanted to make an outdoor flag that was larger than any of my previous flags so first I had to choose a material that was suitable for keeping outside. I decided on pressure treated fence boards that were 6” x 72” x 5/8”.
I first ripped thirteen boards to 2.75” each. I then started using the torch to scorch every other board. This was a slow process because of the moisture content in the boards from the pressure treating process. I decided to lay the boards out on the shop floor in front of a large fan for the weekend. In addition to drying the boards, this would also give the boards a chance to reveal any twists or warps as they dried. After three days of drying, I found that the boards were lighter in weight, they didn’t twist or warp very much at all, and they were a lot easier to scorch with the propane torch.
I then used the torch to scorch every other board. This process was much faster due to the boards being very dry. Once every other board was scorched, I placed them on the floor, face down. I then used some of the leftovers from the original boards to cut five 2” x 36” boards to attach to the back of the flag.
I didn’t have clamps large enough to clamp all 13 boards together at one time, so I cut a few pieces of scrap blocks that I could use temporarily to clamp the strips together. I started in the middle of the flag and I stapled a scrap block to the bottom strip and a scrap block to the eighth strip. I was then able to attach a clamp to the two blocks and tighten it until all of those strips were pulled tightly together.
I was then able to glue and staple one of the 2” strips to the back of the flag, only stapling the strips that were clamped together. I then removed the bottom scrap block and attached another scrap block to the top strip. I was then able to attach a clamp to those scrap blocks and tighten it until all of the strips that were clamped were pulled tightly together. I then stapled and glued the center 2” strip to the top part of the flag. At this point all thirteen strips were attached together with the one center strip on the back. I used this clamping process to attach all five of the 2” strips to the back of the flag. After all of the strips were glued and stapled to the back, I left the flag lying flat on the floor until the glue had dried.
Once the glue had dried, I placed the flag across two saw horses and then used the torch to lightly scorch the stripes that had not been scorched previously. I then determined how large I would need to make the union, marked the area of the union and scorched it thoroughly.
Based on the size of the union, I was able to determine that the stars needed to be 2” each. The stencil needed to be 19” x 23” and I didn’t have a stencil sheet that big. I used a 12” x 18” stencil sheet to make the stencil. As I was marking the stars onto the union, I simply moved the stencil over as needed until all 50 stars were marked.
After all of the stars were marked on the union, I used a Dremel tool with a # 107 carving bit to carve through the scorched wood on each star, revealing the un-scorched wood underneath. I then used the torch to lightly scorch or antique the stars.
Once all of the wood was scorched to the desired tint, I taped off the eighth stripe and painted it blue using Rust-Oleum #7251 Cobalt Blue Metallic.
I needed to coat this flag with an outdoor urethane, so to prevent smearing of the scorched wood, I first sprayed the flag with one coat of Minwax Helmsman Spar Urethane. After the first coat had dried, I was able to apply two brush coats of that urethane without any smearing or smudging. After a couple days of drying, I signed and numbered the back of the flag and then I applied two brush coats of urethane to the back. I then attached a wire hanger to the back and the flag was complete.
This flag was given away locally to a law enforcement family that won it on Facebook. I really appreciate the men and women of law enforcement and all first responders.
Thank you for visiting www.thefurrminator.com
Jeff Furr